Intro
Link: https://hmarti0.gumroad.com/l/rtizk
This Look Dev tool was designed as a tool for artists to be able to easily present their assets in a neutral scene. It should work for most assets, but the lights and HDRI can be changed to fit the asset. Also, I wanted to create an easy way to use the 1-1 method for material creation in Substance Painter to Unreal Engine.
Assets will often look much different in Painter than in Unreal Engine. By using this tool's HDRI options and by following the instructions in my earlier Color Management post, you should be able to have your asset in both programs with very similar lighting environments. If you choose an HDRI with similar light, color, and brightness to your game scene, the rig can work as an in-between while you develop the materials before they go into the scene.
Loading Up The Project
The Look Dev Lighting Rig is an Unreal Engine 5.1 Project. After unzipping, there should be Config and Content folders and the uProject file in the folder.
Once you load up the project, you should be in the LightingRigMaster level. I recommend duplicating this level and working in the duplicate level. Keeping the Master level untouched means you can re-duplicate the master for future projects.
First, before you do any work, please check your Plugins for: 'HDRI Backdrop' and 'Movie Render Queue.' The movie render queue isn't required, but I also have some rendering configurations if you want to render some stills or sequences.
Next, double-check that Support Hardware Raytracing is enabled in the Project Settings. Also that your settings (in the Rendering section) match the image below:
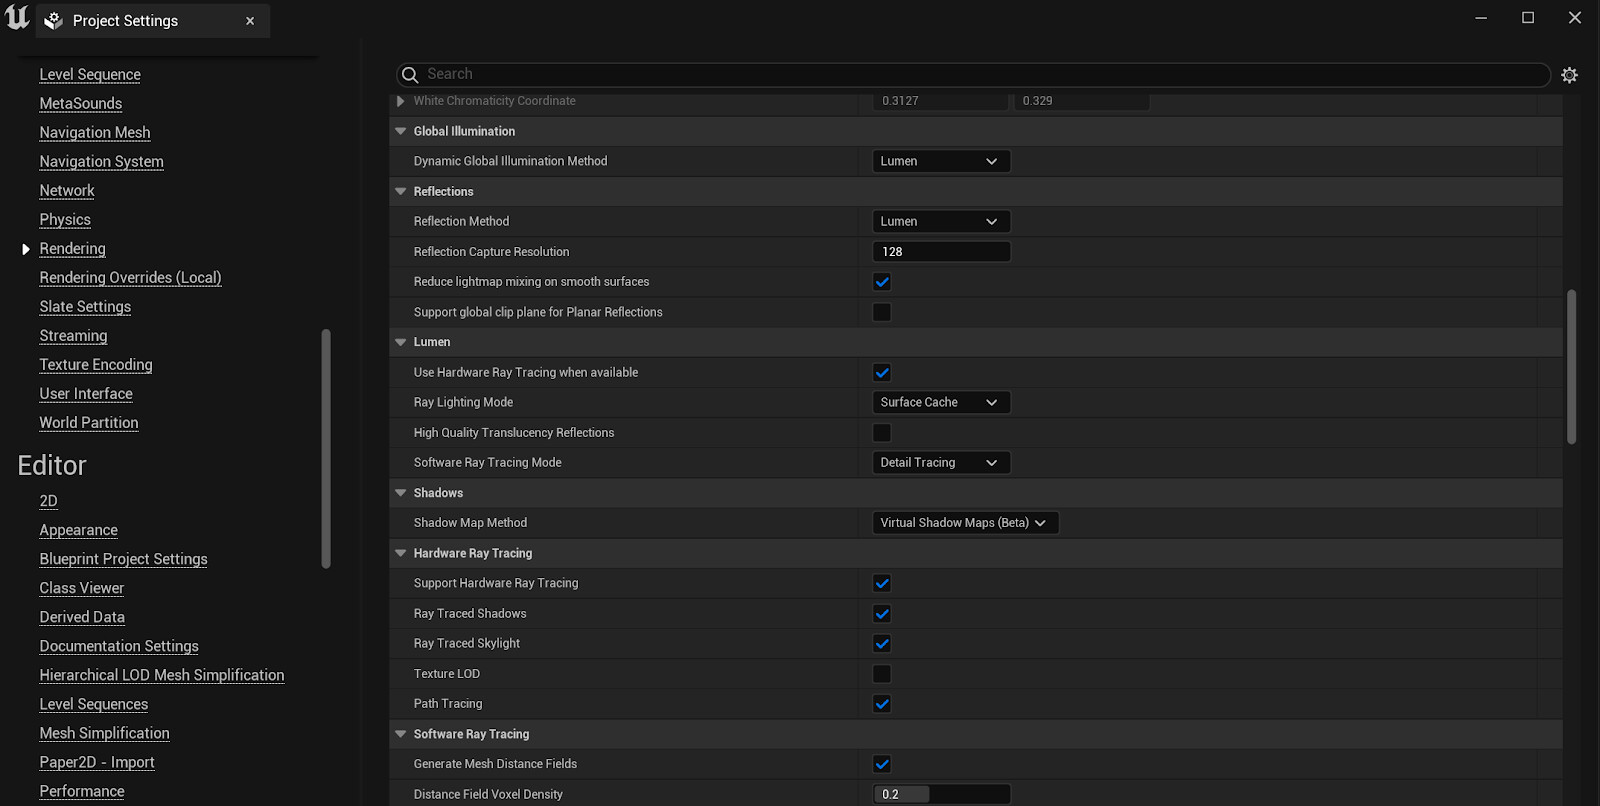
These settings should already be there, but just to prevent any issues, double-check.
Contents of the Project
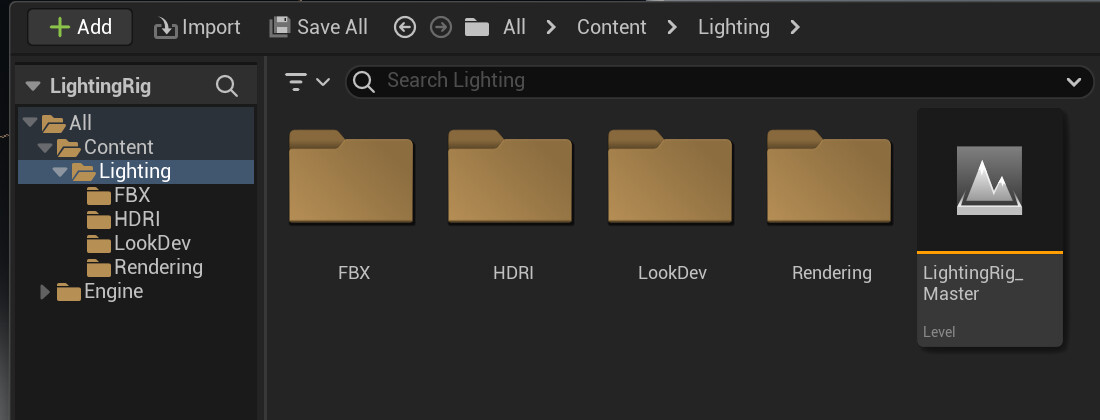
Under Content, there is one folder: Lighting. In the Lighting folder, there are four folders:
- FBX - contains the background meshes
- HDRI - includes 32 HDR files (from Substance Painter)
- LookDev - contains blueprints and materials for the color checkers and LookDev spheres
- Rendering - the turntable sequence and various presets for the movie render queue
All of the meshes and blueprints are already in the rig level, so there's no need to pull anything in. The only thing you are placing in the rig is your own assets and materials. (I'd recommend making Mesh and Material folders outside the Lighting folder.) If you know you'll be using the rig for many of your assets, you should also make a level folder and place the individual asset rig levels in that folder.
The Lighting Rig Level
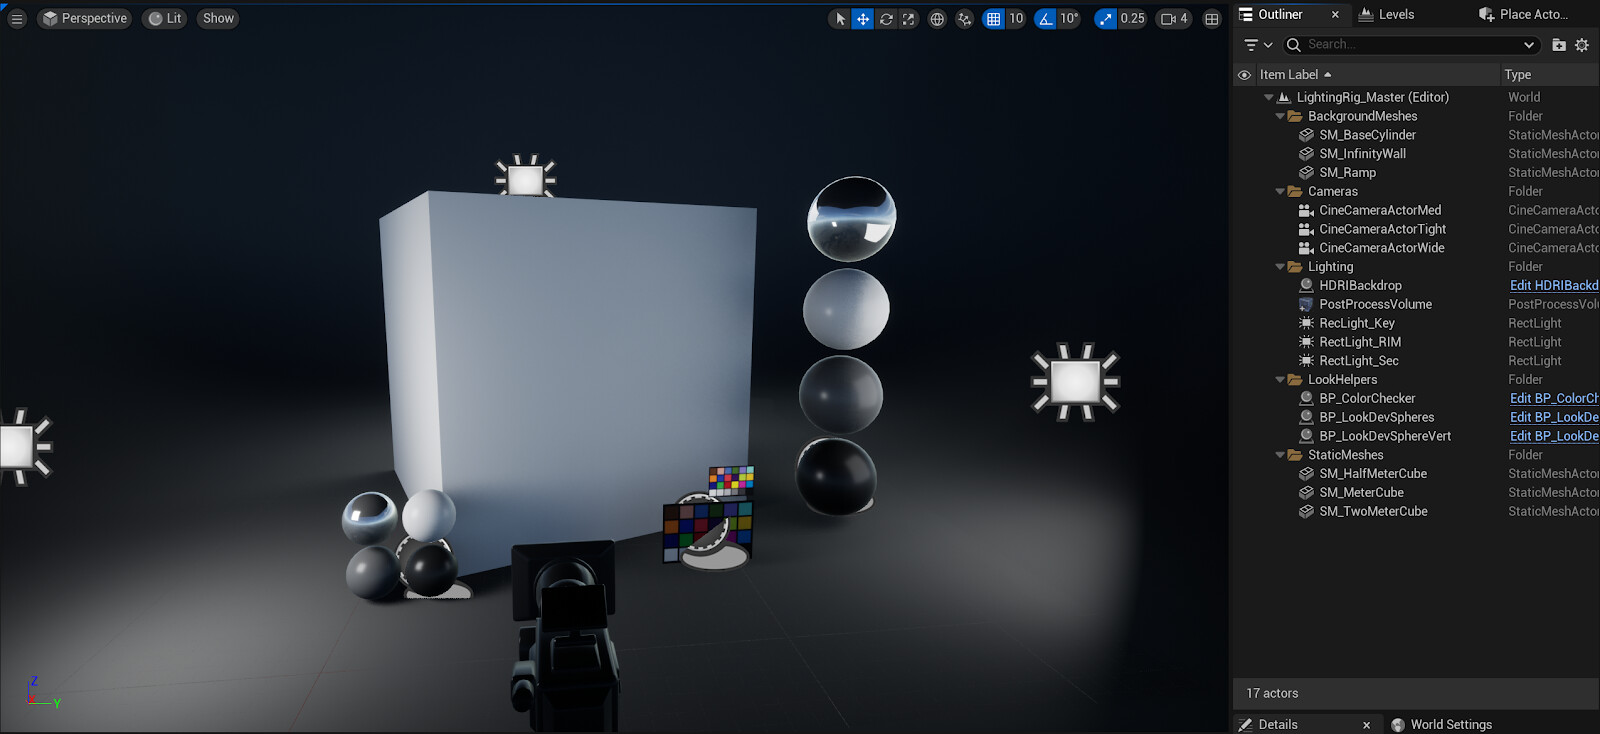
In the Outliner, there are five folders:
- BackgroundMeshes - This folder holds the different options for the background meshes.
- StaticMeshes - these are placeholder cubes for the cameras to focus on.
- Cameras - three cinecameras at different distances from the origin. They all have a focal length of 35 and an aperture of 2.8. Their manual focus distances are eye dropped from their respective cube placeholder.
- LookHelpers
- blueprints for the look dev spheres (chrome, black, white, and mid-grey). These spheres are gauges for how dark or light your scene is. The white should never be blown out, and the black should always be visible.
- There is a blueprint for a color checker, also. The bottom color chart displays how color should react to your scene lighting. The top color chart has an emissive value that negates the environment's lighting. These are 'close' to the actual values of the color. Ideally, these charts should be at similar values in your renders, but it's not very important in games. The chart is seen more in animation, so feel free to hide it.
- Lighting
- the three rect lights for the three-point lighting system. I did not identify any as the key, rim, or anything else because you should tweak these lights when working with your assets, so they're just 1, 2, and 3. (Raytracing is enabled for those soft shadows.)
- Also, the HDRI Backdrop is in this folder. The HDRIs can be switched out here; remember, you have 32 options. The default intensity is 1, but this might need to be adjusted because of the range of different HDRIs. Some are indoor, some are outdoor, and some are studio environments. Some will be very bright, so turn down that intensity.
- The Post process volume - auto exposure is disabled, and Lumen is also disabled. The SM_InfinityWall is set to 'No Cast Shadows,' but due to Lumen's Global Illumination, the wall will block the HDRI's lighting no matter what. You can enable Lumen for your renders if you use the SM_BaseCylinder or the SM_Ramp mesh.
Using the Light Rig
Everything is visible. All of the background meshes, helpers, and placeholders are visible in the scene. Hiding the helpers and placeholders should be the first step.
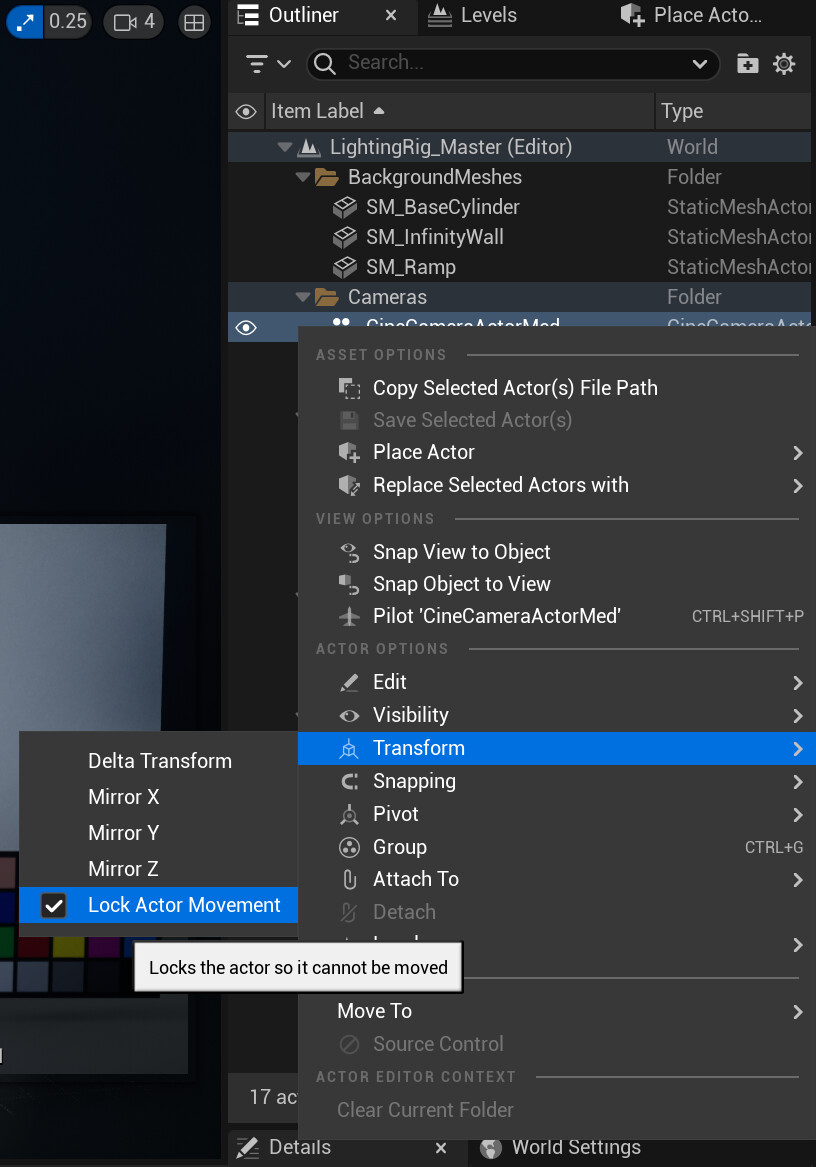
Once you get your asset in, the placeholder cubes should help you with scale and which camera to use. The smallest cube is matched to CineCameaTight and the largest is matched to CineCameraWide. You can, of course, move the cameras and take shots from multiple angles. The cameras are locked, so you just need to unlock them by right-clicking the camera in the Outliner and going to Transform>Lock Actor Movement.
After you set up your cameras and tweak the lights and HDRI, you can also render a turntable sequence.
The Rendering folder has a sequence with the three cameras and one of the placeholder cubes. If you duplicate the level, the actor names with be shown in red.
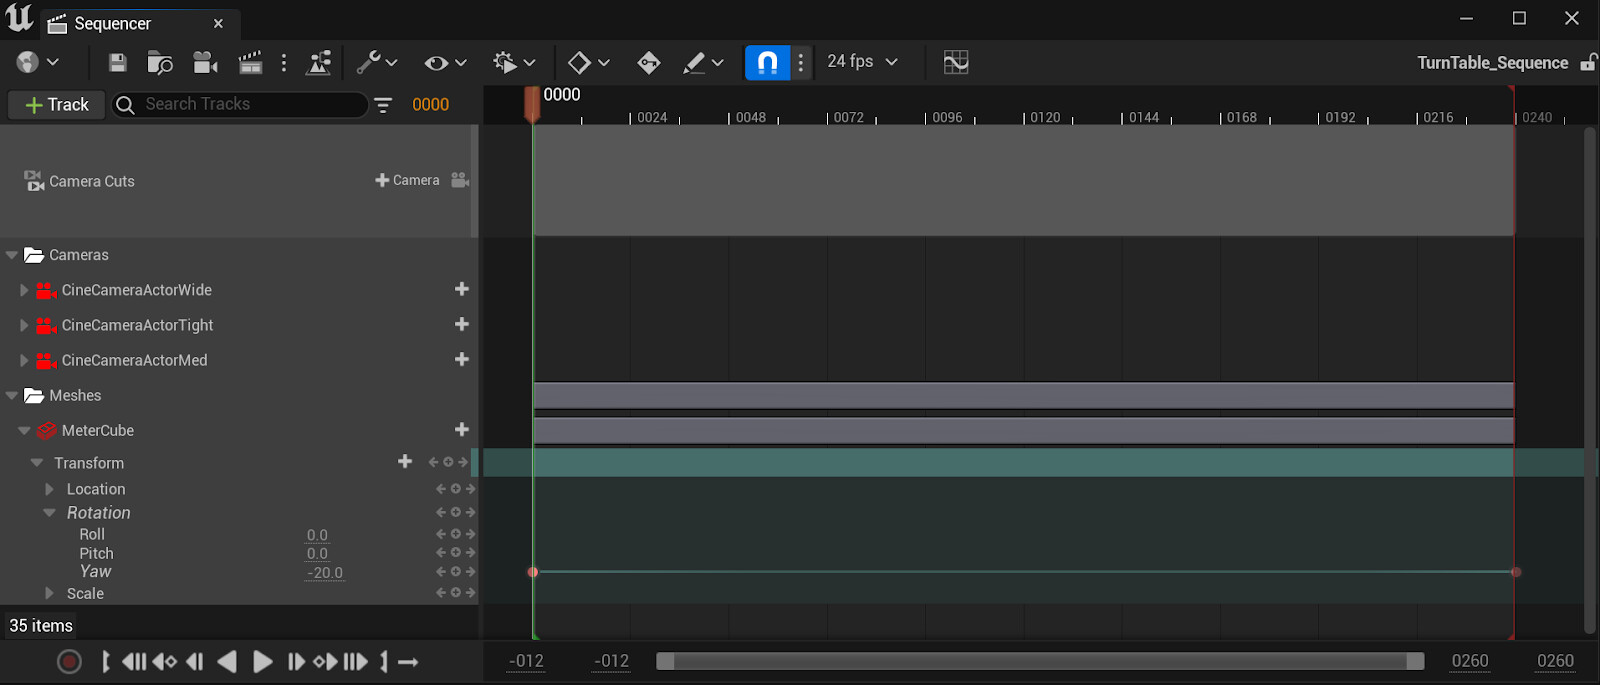
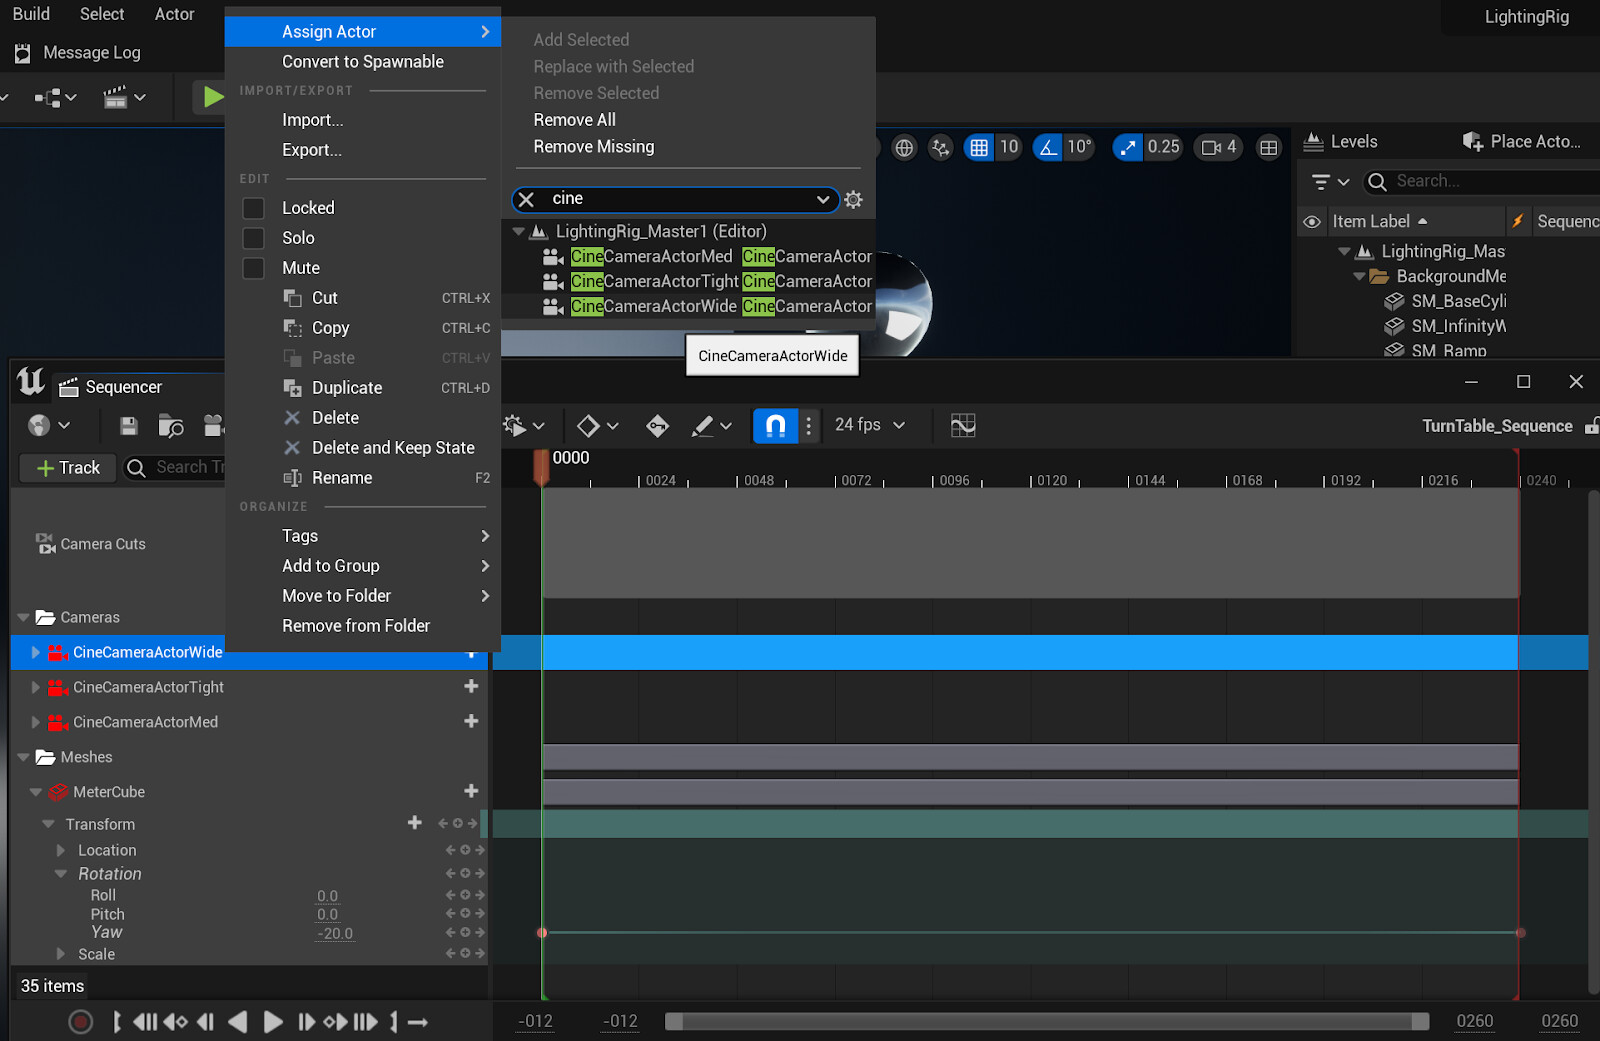
All you need to do is reassign the cameras by right-clicking the actor in the Sequencer and going to Assign Actor>"Camera Name."
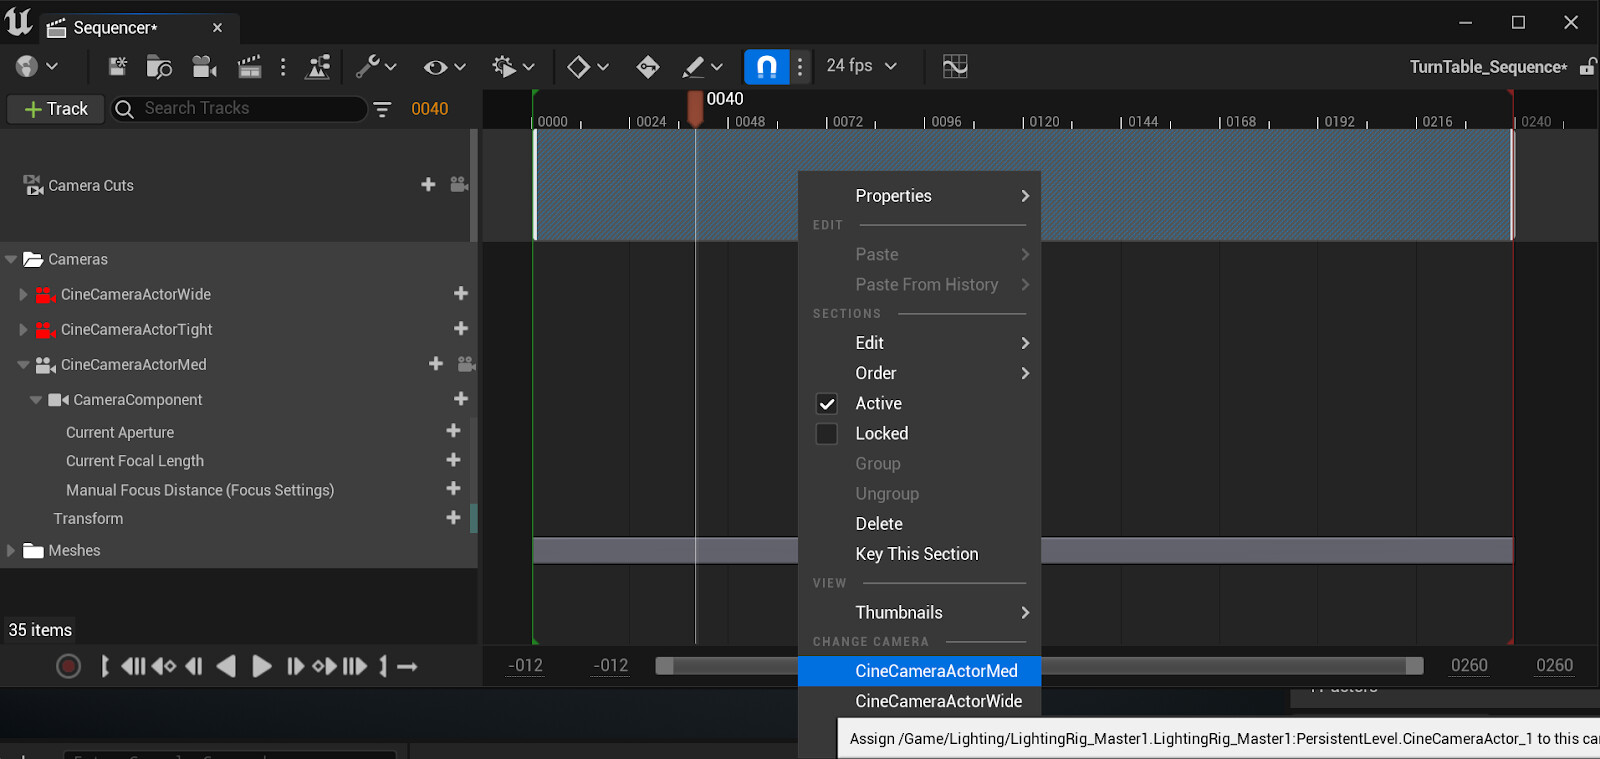
You can replace the "MeterCube" actor with your asset via the same method. This will assign the MeterCube's rotation sequence to your asset, so it will spin 360 degrees during the turntable sequence. Lastly, you need to assign the camera to the Camera Cuts track.
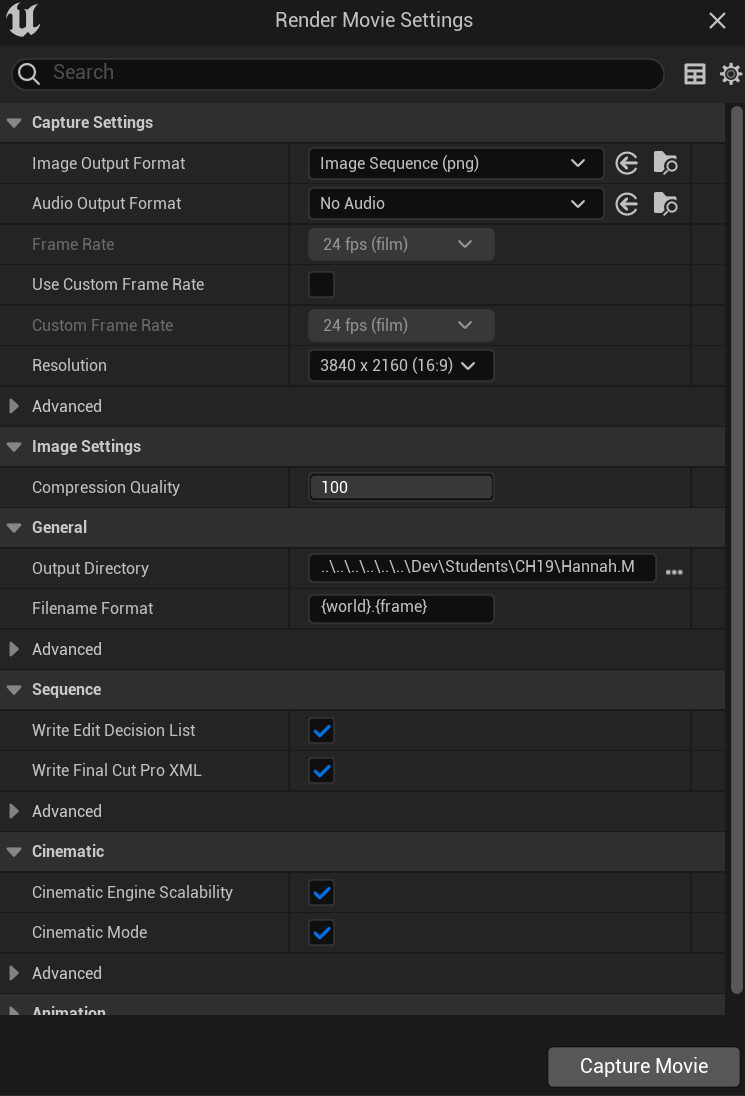
Now, there are two options to render out your turntable. If you don't have the Movie Render Queue or don't care for it, there is the Movie Scene Capture (Legacy) option.
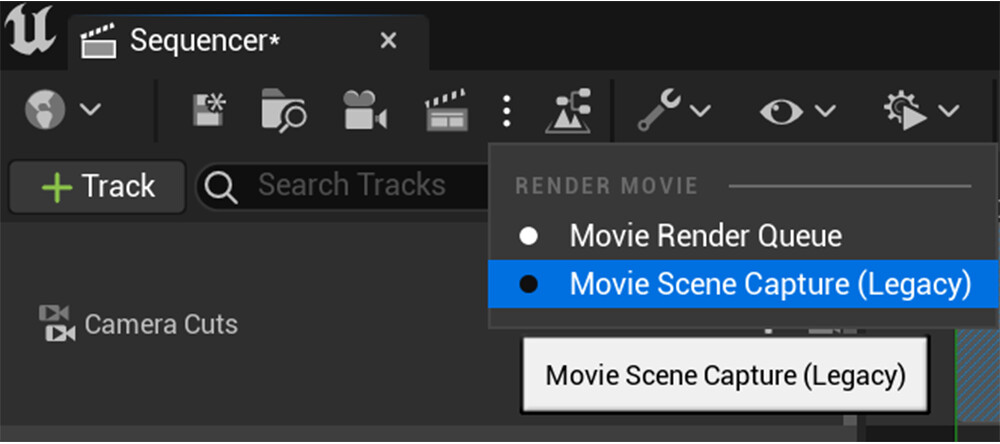
All you have to do is select your Output Format, Resolution, and Output Directory. once you click 'Capture Movie,' your turntable renders into a video or image sequence. Take the sequence into Premier or Davinci Resolve to make a video out of it.
Rendering with the Movie Render Queue
If you did install the Movie Render Queue, you have a few more options.

Upon selecting or opening the Movie Render Queue, a window will pop up with your sequence listed as a 'Job.' You can change the job name in the panel on the right and the Sequence and Map that the job interacts with (you shouldn't have to mess with this.)
Here, the only thing you should need to change is the config under the 'Settings' section.
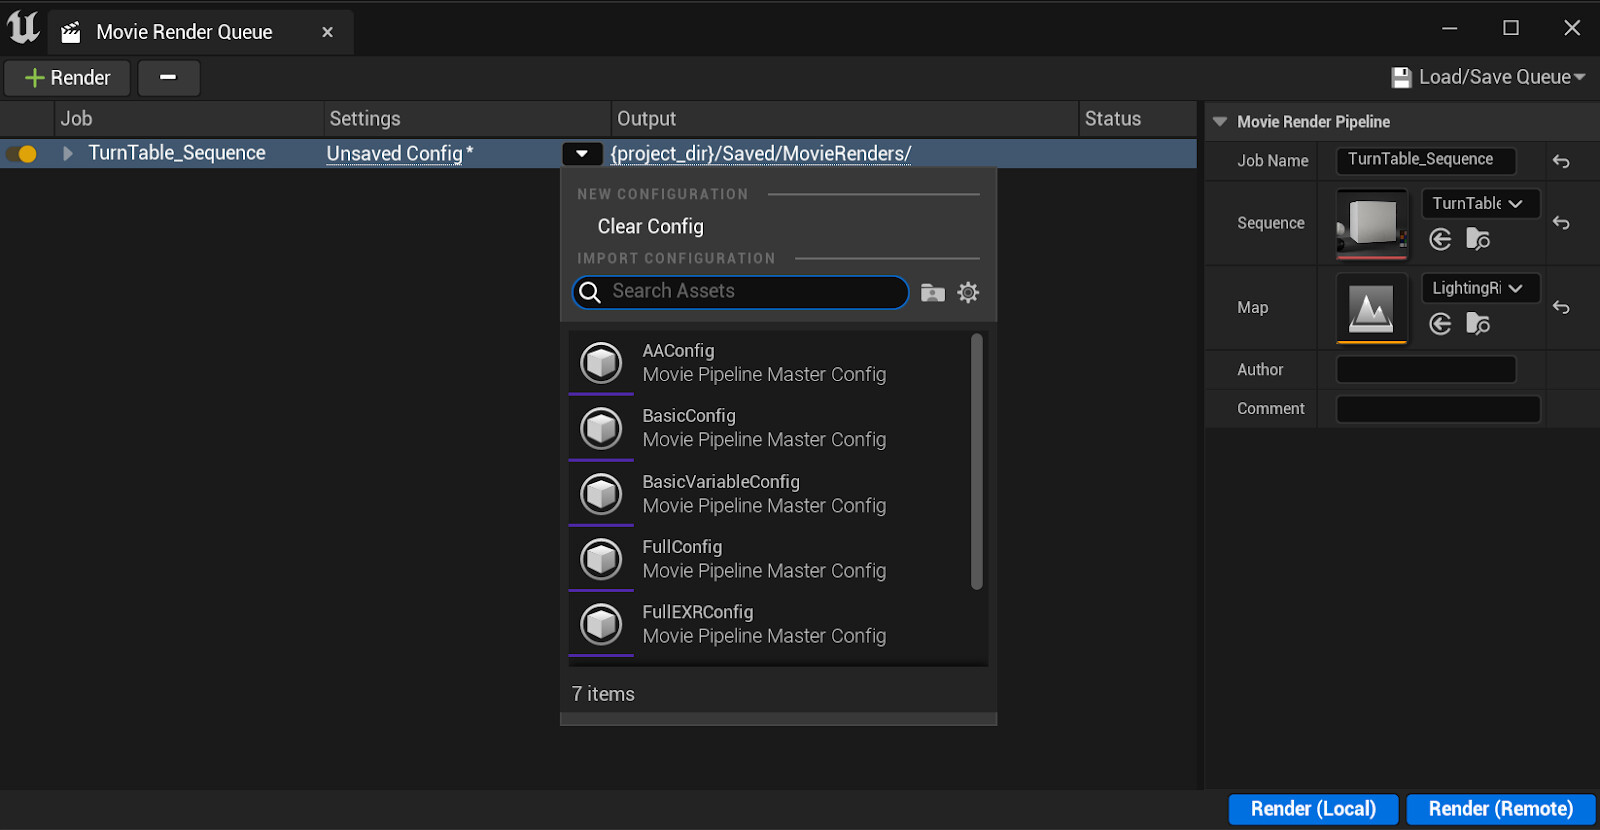
There are seven presents already made in the project for you to use. These configs tell the renderer the info needed to render frames. Things like output format, directory, overrides, anti-aliasing, and variables are set in the config.
Present Descriptions (all configs render to the Saved/MovieRenders folder):
- BasicConfig - this config will only render a png image sequence
- OverridesConfig
- png image sequence
- Overrides for meshes and materials (a bit overkill, but this will ensure that the LOD0 for the asset mesh is used and the textures are fully rendered). Generally, this is already enabled, but if there are issues rendering your mesh, maybe try this config.
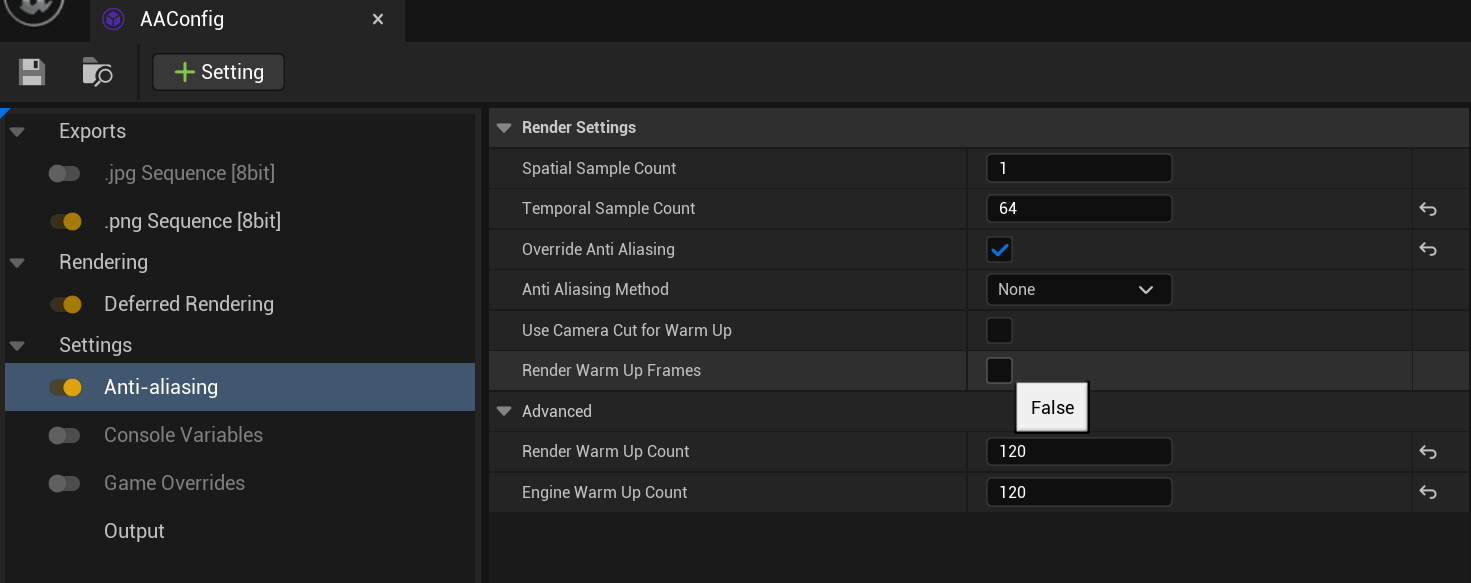
- AAConfig
- png image sequence
- Anti-aliasing with a temporal sampling count of 64. Also, the engine 'warms up' for 120 frames before rendering the sequence. If there is a particle system, this may be helpful. ('Render Warm Up Frames' might need to be enabled for certain particle systems.)
- BasicVariableConfig
- png image sequence
- Console Variables included improving Motion Blur, Depth of Field, Bloom, and Tonemapper quality
- longer rendering
- RTXVariableConfig
- png image sequence
- Includes console variables from BasicVariableConfig
- Includes Console Variables to improve Raytracing Global Illumination, Reflections, and Shadows
- even longer rendering (longer than BasicVariablesConfig)
- FullConfig
- png image sequence
- Has Anti-aliasing settings from AAConfig
- Includes Overrides from OverridesConfig
- Includes Variables from RTXVariableConfig
- Longer render time
- FullEXRConfig
- has AA, Overrides, and Variables from FullCOnfig
- EXR image sequence for editing in a video program
- longest rendering time
Once you choose a config preset, you can render the sequence by clicking 'Render(Local) in the Movie render Queue. Another window will pop up with a Render Preview of the camera cuts and some stats on the rendering. Once the render is done, you can bring the image sequence into a video editing program, and bam! Done!